Installation Instructions
6-volt to 12-volt "Slap-on" Alternator Conversion Kit

12-volt, 200 watt alternator with a built-in voltage regulator and diode board
for BMW motorcycles 1951-1969: BMW R51/3, BMW R67, BMW R68, BMW R50, BMW R50S, BMW R60, BMW R69S, BMW R69


BMW motorcycle BMW motorcycle parts

You will need the following: (You can find them on our secure online parts store)

12310002035A--17mm "slap on" alternator conversion kit 6-volt to 12-volt 1951-1969 BMW twins
12310002035B--20mm "slap on" alternator conversion kit 6-volt to 12-volt 1951-1969 BMW twins
63 12 1 354 619$9.95--headlight bulb H4 12V 60/55 watt
07 11 9 978 227--bulb 12v license plate & Enduro bags Earles Fork twins
07 11 9 978 256--bulb 12v parking light Earles Fork twins
07 11 9 978 254--bulb 12v generator/neutral light Earles Fork twins (quantity 2)
07 11 9 978 279--bulb 12-volt speedometer 1955-1969 singles & twins
07 11 9 978 384--bulb 12v tail/brake /5, /6 & 12-volt Earles Fork twins
or option 07 11 9 978 384.1--bulb 12v halogen tail/brake /2 /5 /6 Photo
63 12 1 243 541C--headlight Halogen conversion assembly H4 12V with bulb fits 1951-1969 twins & /5
63 12 1 243 541P--female plug for headlight Halogen conversion assembly for 63 12 1 243 541C
61 21 8 042 027C--battery 12-volt Yuasa 1955-1969 twins (1951-1954 requires a different battery)
07 11 9 978 311--bulb Hella turn signal 12-volt R25-R69S (quantity 2 - only if you have bar-end turn signals)
option 61 31 8 048 146--flasher signal indicator relay 12-volt (only if you have bar-end turn signals)
R69S option acc017--adapter bushing R69S vibration damper with Bench Mark Works LLC 12-volt alternator
optional accessory 27D--battery tender 12-volt. Trickle charger with a brain! Switches automatically from charge to float. Photo

This alternator does not require wiring modifications to the original harness. This unit carries a one year warranty. Please read the entire instructions once before proceeding with work!

1. The following cautions are very important. I can't stress how important they are, other than to say you can void your warranty and damage the electrical system if you don't follow the caution guidelines.

CAUTION ONE! This is an alternator system, not a generator system! This means you cannot run the motorcycle without a battery. If you do so, you will destroy the voltage regulator and diode board. A dead or weak battery in the system will also cause this charging system to over-charge (create excess heat) which can destroy the diode board. I highly recommend the installation and the use of a "smart battery trickle-charge system" to insure that the battery stays fully charged, even during storage. Bench Mark Works LLC sells such a battery charger: accessory 27D--battery tender 12-volt. Trickle charger with a brain! Switches automatically from charge to float. Photo. Running the motorcycle without a fully-charged battery voids the alternator conversion warranty.

CAUTION TWO! Please understand that while this is a powerful alternator, the total wattage demand must not exceed 200 watts. Your normal lighting configuration of a 55/65 watt H4 halogen headlight and the related normal 12-volt dual filament brake/tail light bulb, and related illumination bulbs will not come close to this limit. However, if you install high wattage auxiliary lighting, or use high wattage demand electrically heated clothes, you must determine that total wattage demand of your accessories. Exceeding the 200 watt limit will ultimately cause failure of the alternator conversion unit. If in doubt about the wattage of an accessory check with the manufacturer. Exceeding the 200 watt limit voids the alternator conversion warranty.

CAUTION THREE! Be sure to note (physically mark) what lead is the positive (+) lead and what lead is the negative, ground (-) lead on your old battery. Disconnect and remove the 6-volt battery from the machine. You must mark the leads so that later, when you install the 12-volt battery, you do not reverse the battery leads. If you reverse the battery leads, it will damage the new alternator. Solid state electronics do not tolerate reversed polarity. If you reverse the leads, it voids the alternator conversion warranty.

antique 
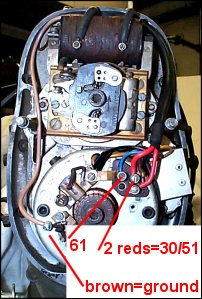
2. Once your old 6-volt battery is disconnected, remove it. Then remove the front generator cover from the engine.
<------- Note that there are 4 wires attached to the 6-volt generator. The wires and corresponding terminals are:

A) One blue wire (which runs to the charge light) is attached to terminal # 61 on the generator.

B) Two red, (or sometimes one red, one black wire) heavy wires attached to terminals # 30/51 on the generator. (One of these wires runs to the headlight main switch, the other to the (+) terminal of the battery)

C) One brown wire (ground) which is attached to the unmarked terminal next to the negative (-) brush on the lower left face of the generator. Remove All of these wires from their respective terminals and move them aside temporarily.

vintage 3. Use the 5mm allen wrench (supplied in the kit) and remove the two socket head cap screws which retain the field of the generator to the front timing gear cover of the engine. Gently remove the field from the gear cover and set it aside. It is sometimes necessary to gently bump the side of the generator field with a mallet to dislodge it from the cover.

classic 
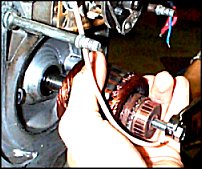
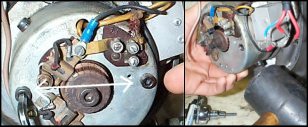
4. Use the 6mm allen wrench (supplied in the kit) and remove the socket head cap screw that retains the armature of the generator on the nose of the crankshaft. In place of the socket head cap screw, install the special puller bolt (supplied in the kit) and screw the puller bolt in, until it bottoms in the hole. Place one hand on the body of the armature, and use a 13mm wrench (not supplied) to tighten the puller bolt. The puller bolt will pop the armature off of the nose of the crankshaft, and your spare hand will keep the armature from falling on the floor. Occasionally, the puller bolt will require quite a bit of force, and may require you to “rap” the end of the puller bolt with a hammer, to shock the assembly, and to make the armature pop off the shaft.

Please continue to page two

Back to Tech Articles