How to Set the Valves


by Elaine C. Vechorik


From Elaine's journal of learning to ride
and restore a 1968 BMW R50 motorcycle
(8/14/99)


We sold a bike to a local man who needed to learn to set the valves. I figured it was a good time to learn for myself since on the 1955-1969 BMW motorcycles, one should set the valves at each 10,000 mile increment. You should also set the valves about 500 miles after a complete engine re-build.

Here's how it's done:
(Click to view the diagram if you're not sure of the part name and location)

1) The engine must be cold. Set a pan on the floor beneath the valve cover to catch the oil that's about to run out. Remove the valve cover (a 10 mm wrench on the two side nuts and a 13 or 14 mm wrench on the valve cover center nut). Remove the cover. If it's stuck, tap the top side lightly in an outward motion with a soft mallet to loosen and remove the cover.

2) Now, remove the spark plug. Remove the engine timing cover plug. What you are going to do is set the first cylinder (your choice) in the correct position at top dead center, so you can set the valves. Vech always starts with the left one, since it is on the same side as the kickstart lever. There are two methods you can use to rotate the engine to get the piston and valves in the correct position. One way is to remove the front engine cover and use an allen wrench on the socket head cap screw on the crankshaft. Another (easier way) is to use the kickstart lever to turn the engine. Put your thumb over the spark plug hole and tap the kick start lever to turn the motor. When you feel air pushing on your thumb, stop tapping the lever. The air pressure on your thumb indicates that the cylinder is now on the compression stroke. Now, watch the timing hole on the flywheel. You are looking for the engine timing marks on the flywheel. Rotate the engine slowly and the first mark that comes up is the "F" mark. This mark is what you should see if you were using a timing light and the engine was running at high speed. The "F" mark is the full advance timing mark. Keep tapping the kickstart lever until the "S" mark appears (this is when the points open and what should appear under a timing light at idle. Keep bumping the kickstart lever until the "OT" mark appears. Get the scribed line of the "OT" mark to line up with the stationary stamped line that is on the forward side of the timing hole. If you go past it, then just start this step over again until you get the "OT" mark centered. By the way, "OT" means "Over Top" dead center.

3) Since the valve cover is off, it's a good time to check the push rods for bends. Put your head down so that your eyes are level with the push rods. Turn, roll or spin the push rod with your index finger. Watch for a wobble or an "up and down" motion which indicates a bent push rod. The rods should spin and turn smoothly in such a way you know they're perfectly straight. If you aren't sure the rods are straight, get an experienced person's advice. If you discover a bent push rod, order another one. A bent push rod will flex under load and will cause the engine to run noisy. The rod will not retain the valve lash setting.

4) Re-torque the head bolts ("torque the heads").
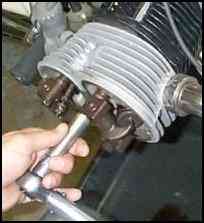
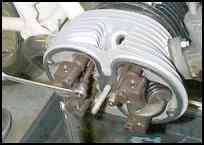
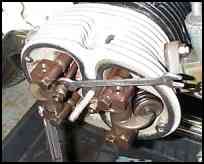
To do this, take a 14 mm torque wrench and set it at 28 foot/pounds. Check each head bolt by tightening it to 28 foot/pounds. You should do this to the four head bolts in an "X" pattern. If you have an R69 or a R69S, there will be six head bolts. If the head bolts do move at 28 foot/pounds of force, usually you will find that the valve lash (clearance between the valve stem and the end of the rocker arm) will close tight. That's why you must use a feeler gauge to re-adjust them.
head bolts


5) To actually set the valves, you need a 11 mm and 12 mm wrench and a .006 (.015 metric) and .008 (.020 metric) feeler gauge. The .006 for the intake valve and the .008 for the exhaust.

6) Take a 12 mm wrench and loosen the jam nut on the adjuster bolt at the end of the rocker arm.
jam nut


7) Open the clearance between the valve stem and the rocker arm. You must shorten the length of the adjuster bolt on the side of the rocker arm that the push rod is on. To do this, you must thread the adjuster bolt deeper into the rocker arm. Since the adjuster bolt is facing toward you, rather than away from you, you will have to turn the adjuster bolt counter-clockwise (to the left) with a 11 mm wrench. To lessen the clearance, turn the adjuster bolt in the opposite direction.

8) Insert the proper gauge between the rocker arm and the end of the valve stem. Finger-tighten the adjuster nut while the gauge is still between the rocker arm and the valve stem. At this point, you should not be able to pull out the feeler gauge with a moderate pull. Now, place a 12 mm box end wrench on the lock nut and slap the wrench tight in one motion. If the threads of the adjuster bolt and the jam nut have not been excessively pulled by the previous owner, eight out of ten times, the adjuster bolt will not move as the jam nut is tightened. The act of tightening the jam nut will stretch the adjuster bolt just the correct amount so that you will obtain the desired clearance of .006 for the intake and .008 for the exhaust. adjuster nut


9) The trick to all of this is to develop a feel for the amount of drag (or effort) required to pull the feeler gauge out from between the end of the valve stem and the rocker arm. Light drag is correct. If it requires a heavy pull, the valve is too tight. If the feeler gauge comes out with a "v" grooved into it (bent feeler gauge) then it's too tight. Fortunately, Vech was here to teach me. If you know an experienced mechanic, it would only take a few minutes for them to show you their machine and let you get "the feel of feeler gauges."

Another trick is to use the correct feeler gauge to set the distance. Then, take the next larger size feeler gauge and insert it into the space you set. It won't fit. Now try the next smaller size feeler gauge than the correct one. It should be too loose.

10) Ok, now all you have to do is set the valves on the opposite cylinder. Just repeat the whole process, replace the valve covers and now you're ready to ride! It's a good idea to keep a log book for your bike, so you'll know when the next 10,000-mile-valve-set-session is due. Setting the valves really is easy. The only hard part is learning the "feel of the gauge" to know when it's too loose or too tight. If you'd like to bring your bike to Vech and have him set the valves, he will teach you to do it at the same time. Call Elaine or Vech for an appointment: (662) 465-6444 central standard time.


Back to Tech Articles